m (Added additional First Win reward info) Tags: Visual edit apiedit |
No edit summary Tag: Source edit |
||
| (85 intermediate revisions by 7 users not shown) | |||
| Line 1: | Line 1: | ||
{{Grand Prix Story}} |
{{Grand Prix Story}} |
||
| − | There are many different '''races''' you can compete in, with various degrees of difficulty. |
+ | There are many different '''races''' you can compete in, with various degrees of difficulty. Once you have a winning a GP in normal race, you will not receive the Winning Message during Grand Prix. |
| + | ==Special Message== |
||
| + | {| class="wikitable centertext" |
||
| + | |- |
||
| + | ! scope="row"|Condition |
||
| + | ! scope="col"|Message |
||
| + | |- |
||
| + | ! scope="row" style="text-align:center;"|Full Driver's Energy |
||
| + | | style="text-align:center;"|I slept like a baby last night, so I think I'll do well today. |
||
| + | |- |
||
| + | ! scope="row" style="text-align:center;"|Pre-GP Race |
||
| + | | style="text-align:center;"|The Grand Prix is about to begin. I'll try to start out with a bang! |
||
| + | |- |
||
| + | ! scope="row" style="text-align:center;"|Last GP Race with Bad Performance |
||
| + | | style="text-align:center;"|This is the last race, but I won't give up. We might pull off an upset victory |
||
| + | |- |
||
| + | ! scope="row" style="text-align:center;"|GP Podium Winning Streak |
||
| + | | style="text-align:center;"|I think we're in good shape, but I won't let my guard down. |
||
| + | |- |
||
| + | ! scope="row" style="text-align:center;"|Road Condition Compatible |
||
| + | | style="text-align:center;"|The road conditions are perfect! I should be able to go even faster than usual! |
||
| + | |} |
||
| + | |||
| + | ==Team Info== |
||
| + | When viewing the team info, you may see the info of:[[File:Viewing_Team_Info_-_Grand_Prix_Story.png|thumb|270px]] |
||
| + | *Your Team Name |
||
| + | *Formula Category |
||
| + | *No. Members |
||
| + | *Total Salary |
||
| + | *Total Prize |
||
| + | *Record Win/Played Race |
||
| + | *No. Researched Vehicle |
||
| + | *No. <span style="font-weight:normal;">Research</span>ed Part |
||
| + | *Image of Researched Vehicle |
||
| + | |||
| + | ==Departing a Race== |
||
| + | When viewing the depart for race, you may see the info of:[[File:Race_Depart_-_Grand_Prix_Story.png|thumb|340px]] |
||
| + | *Vehicle Durability Bar |
||
| + | *Aura |
||
| + | *Driver |
||
| + | *Vehicle Type |
||
| + | *Speed |
||
| + | *Acceleration |
||
| + | *Handling |
||
| + | *Driving |
||
| + | *Road Condition |
||
| + | |||
| + | ==Pre-Race== |
||
| + | You may perform a preliminary time trial that determines your starting order in the race. |
||
==Normal Races== |
==Normal Races== |
||
The prize listed is given to the driver in 1st place. 2nd place gets 50%, 3rd gets 30%, 4th gets 20%, 5th gets 15%, 6th gets 13.6%, 7th gets 12.7%, 8th gets 11.8%, 9th gets 10.9%, and 10th gets 10%. |
The prize listed is given to the driver in 1st place. 2nd place gets 50%, 3rd gets 30%, 4th gets 20%, 5th gets 15%, 6th gets 13.6%, 7th gets 12.7%, 8th gets 11.8%, 9th gets 10.9%, and 10th gets 10%. |
||
| + | |||
| + | ''The image is 100 px - For Reference to Image Placeholder'' |
||
| + | |||
| + | [[File:Research_Points-GrandPrixStory.png]] denotes amount in Research Point rewards. |
||
{| class="wikitable oddrow centertext firstcolumnleft" |
{| class="wikitable oddrow centertext firstcolumnleft" |
||
| + | !Image |
||
!Race |
!Race |
||
| + | !Description |
||
| − | !Prize |
||
| + | !Hint |
||
| + | !Level |
||
| + | !Prize ($) |
||
!Laps |
!Laps |
||
!Road Type |
!Road Type |
||
| Line 15: | Line 71: | ||
!Reward For First Win |
!Reward For First Win |
||
|- |
|- |
||
| + | | style="text-align:center;"|[[File:Bloomtown_Circuit_-_Grand_Prix_Story.png|100px]] |
||
| − | |Bloomtown |
||
| + | | style="text-align:center;"|Bloomtown |
||
| − | |80K |
||
| + | | style="text-align:center;"|Simple but deep layout. |
||
| − | |1 |
||
| + | | style="text-align:center;"|Requires balanced stats. |
||
| − | |On-Road |
||
| + | | style="text-align:center;"|[[File:Bloomtown_Level_Star_-_GP_Story.png|100px]] |
||
| − | |1 |
||
| + | | style="text-align:center;"|80K |
||
| − | | |
||
| + | | style="text-align:center;"|1 |
||
| − | |Bridgerock sponsorship |
||
| + | | style="text-align:center;"|On-Road |
||
| + | | style="text-align:center;"|1 |
||
| + | | style="text-align:center;"|First race |
||
| + | | style="text-align:center;"|'''Bridgerock''' sponsorship |
||
|- |
|- |
||
| + | | style="text-align:center;"|[[File:Zen_Garden_Circuit_-_Grand_Prix_Story.png|100px]] |
||
| − | |Zen Garden |
||
| + | | style="text-align:center;"|Zen Garden |
||
| − | |120K |
||
| + | | style="text-align:center;"|An oval, high-speed urban circuit. |
||
| − | |1 |
||
| + | | style="text-align:center;"|<span style="font-weight:normal;">Mild turns. </span>Focus on speed and accel. |
||
| − | |On-Road |
||
| + | | style="text-align:center;"|[[File:Zen_Garden_Star_Level_-_Grand_Prix_Story.png|100px]] |
||
| − | |2 |
||
| + | | style="text-align:center;"|120K |
||
| − | |Win Bloomtown |
||
| + | | style="text-align:center;"|1 |
||
| − | | |
||
| + | | style="text-align:center;"|On-Road |
||
| + | | style="text-align:center;"|2 |
||
| + | | style="text-align:center;"|Win Bloomtown |
||
| + | | style="text-align:center;"|50 [[File:Research_Points-GrandPrixStory.png]] |
||
|- |
|- |
||
| + | | style="text-align:center;"|[[File:Dusty_Plains_Circuit_-_Grand_Prix_Story.png|100px]] |
||
| − | |Dusty Plains |
||
| + | | style="text-align:center;"|Dusty Plains |
||
| − | |140K |
||
| + | | style="text-align:center;"|Starts off with many turns. Brace yourself! |
||
| − | |1 |
||
| + | | style="text-align:center;"|Speed and accel. are key here. |
||
| − | |On-Road |
||
| + | | style="text-align:center;"|[[File:Dusty_Plains_Star_Level_-_Grand_Prix_Story.png|100px]] |
||
| − | |2 |
||
| + | | style="text-align:center;"|140K |
||
| − | |Win Zen Garden |
||
| + | | style="text-align:center;"|1 |
||
| − | | |
||
| + | | style="text-align:center;"|On-Road |
||
| + | | style="text-align:center;"|2 |
||
| + | | style="text-align:center;"|Win Bloomtown |
||
| + | | style="text-align:center;"|'''Mocha Cola''' sponsorship |
||
|- |
|- |
||
| + | | style="text-align:center;"|[[File:Snowville_Circuit_-_Grand_Prix_Story.png|100px]] |
||
| − | |Snowville |
||
| + | | style="text-align:center;"|Snowville |
||
| − | |180K |
||
| + | | style="text-align:center;"|Turns abound. Snow too. |
||
| − | |1 |
||
| + | | style="text-align:center;"|Handling and accel. needed for turns. |
||
| − | |On-Road |
||
| + | | style="text-align:center;"|[[File:Snowville_Level_Star_-_GP_Story.png|100px]] |
||
| − | |2 |
||
| + | | style="text-align:center;"|180K |
||
| − | |Win Dusty Plains |
||
| + | | style="text-align:center;"|1 |
||
| − | | |
||
| + | | style="text-align:center;"|On-Road |
||
| + | | style="text-align:center;"|2 |
||
| + | | style="text-align:center;"|Win Dusty Plains |
||
| + | | style="text-align:center;"|'''Dragster''' plans<br />or<br />70 [[File:Research_Points-GrandPrixStory.png]]<sup>1</sup> |
||
|- |
|- |
||
| + | | style="text-align:center;"|[[File:Sand_Beach_Circuit_-_Grand_Prix_Story.png|100px]] |
||
| − | |Sand Beach |
||
| + | | style="text-align:center;"|Sand Beach |
||
| − | |200K |
||
| + | | style="text-align:center;"|Yow, hot! Sharp turns after the straights! |
||
| − | |1 |
||
| + | | style="text-align:center;"|Focus on both speed and handling! |
||
| − | |On-Road |
||
| + | | style="text-align:center;"|[[File:Sand_Beach_Level_Star_-_GP_Story.png|100px]] |
||
| − | |2 |
||
| + | | style="text-align:center;"|200K |
||
| − | |Win Snowville |
||
| + | | style="text-align:center;"|1 |
||
| + | | style="text-align:center;"|On-Road |
||
| + | | style="text-align:center;"|2 |
||
| |
| |
||
| + | <p style="text-align:center;">Win Snowville</p> |
||
| + | | style="text-align:center;"|70 [[File:Research_Points-GrandPrixStory.png]] |
||
|- |
|- |
||
| + | | style="text-align:center;"|[[File:Japan_GP_Circuit_-_Grand_Prix_Story.png|100px]] |
||
| − | |Japan |
||
| + | | style="text-align:center;"|Japan GP |
||
| − | |240K |
||
| + | | style="text-align:center;"|New circuit built near the sea. Short, with many turns. |
||
| − | |1 |
||
| + | | style="text-align:center;"|Many tight curves. Needs handling. |
||
| − | |On-Road |
||
| + | | style="text-align:center;"|[[File:Japan_Level_Star_-_GP_Story.png|100px]] |
||
| − | |3 |
||
| + | | style="text-align:center;"|240K |
||
| − | |Move to 2nd Workshop |
||
| + | | style="text-align:center;"|1 |
||
| − | | |
||
| + | | style="text-align:center;"|On-Road |
||
| + | | style="text-align:center;"|3 |
||
| + | | style="text-align:center;"|Move to 2nd Workshop |
||
| + | | style="text-align:center;"|'''Wing Car '''plans |
||
|- |
|- |
||
| + | | style="text-align:center;"|[[File:Hungary_GP_Circuit_-_Grand_Prix_Story.png|100px]] |
||
| − | |Hungary |
||
| + | | style="text-align:center;"|Hungary GP |
||
| − | |280K |
||
| + | | style="text-align:center;"|Mid-length, low-speed. Gears.tires are crucial! |
||
| − | |1 |
||
| + | | style="text-align:center;"|Needs speed and accel. |
||
| − | |On-Road |
||
| + | | style="text-align:center;"|[[File:Hungary_Level_Star_-_GP_Story.png|100px]] |
||
| − | |3 |
||
| + | | style="text-align:center;"|280K |
||
| − | |Move to 2nd Workshop |
||
| + | | style="text-align:center;"|1 |
||
| − | | |
||
| + | | style="text-align:center;"|On-Road |
||
| + | | style="text-align:center;"|3 |
||
| + | | style="text-align:center;"|Move to 2nd Workshop |
||
| + | | style="text-align:center;"|80 [[File:Research_Points-GrandPrixStory.png]] |
||
|- |
|- |
||
| + | | style="text-align:center;"|[[File:Egypt_GP_Circuit_-_Grand_Prix_Story.png|100px]] |
||
| − | |Egypt |
||
| + | | style="text-align:center;"|Egypt GP |
||
| − | |260K |
||
| + | | style="text-align:center;"|Shaped like a pharaoh's seal. |
||
| − | |1 |
||
| + | | style="text-align:center;"|Use an off-roader with speed and accel. |
||
| − | |Off-Road |
||
| + | | style="text-align:center;"|[[File:Egypt_Level_Star_-_GP_Story.png|100px]] |
||
| − | |3 |
||
| + | | style="text-align:center;"|260K |
||
| − | |Move to 2nd Workshop |
||
| + | | style="text-align:center;"|1 |
||
| − | | |
||
| + | | style="text-align:center;"|Off-Road |
||
| + | | style="text-align:center;"|3 |
||
| + | | style="text-align:center;"|Move to 2nd Workshop |
||
| + | | style="text-align:center;"|'''Stdlss Tires''' part plans<br />or<br />90 [[File:Research_Points-GrandPrixStory.png]]<sup>1</sup> |
||
|- |
|- |
||
| + | | style="text-align:center;"|[[File:Brazil_GP_Circuit_-_Grand_Prix_Story.png|100px]] |
||
| − | |Brazil |
||
| + | | style="text-align:center;"|Brazil GP |
||
| − | |300K |
||
| + | | style="text-align:center;"|Runs counter-clockwise. Tests any team's mettle! |
||
| − | |2 |
||
| + | | style="text-align:center;"|Accel. and handling for many twists and turns. |
||
| − | |On-Road |
||
| + | | style="text-align:center;"|[[File:Brazil_Level_Star_-_GP_Story.png|100px]] |
||
| − | |3 |
||
| + | | style="text-align:center;"|300K |
||
| − | |Move to 2nd Workshop |
||
| + | | style="text-align:center;"|2 |
||
| − | | |
||
| + | | style="text-align:center;"|On-Road |
||
| + | | style="text-align:center;"|3 |
||
| + | | style="text-align:center;"|Move to 2nd Workshop |
||
| + | | style="text-align:center;"|90 [[File:Research_Points-GrandPrixStory.png]] |
||
|- |
|- |
||
| + | | style="text-align:center;"|[[File:Germany_GP_Circuit_-_GP_Story.png|100px]] |
||
| − | |Germany |
||
| + | | style="text-align:center;"|Germany GP |
||
| − | |340K |
||
| + | | style="text-align:center;"|A circuit of legend. Try the sausage too! |
||
| − | |1 |
||
| + | | style="text-align:center;"|Gentle turns needing speed and accel. |
||
| − | |On-Road |
||
| + | | style="text-align:center;"|[[File:Germany_Level_Star_-_GP_Story.png|100px]] |
||
| − | |3 |
||
| + | | style="text-align:center;"|340K |
||
| − | |Move to 3rd Workshop |
||
| + | | style="text-align:center;"|1 |
||
| − | | |
||
| + | | style="text-align:center;"|On-Road |
||
| + | | style="text-align:center;"|3 |
||
| + | | style="text-align:center;"|Move to 3rd Workshop |
||
| + | | style="text-align:center;"|140 [[File:Research_Points-GrandPrixStory.png]] |
||
|- |
|- |
||
| + | | style="text-align:center;"|[[File:Russia_GP_Circuit_-_GP_Story.png|100px]] |
||
| − | |Russia |
||
| + | | style="text-align:center;"|Russia GP |
||
| − | |360K |
||
| + | | style="text-align:center;"|Outside Moscow. The piroshki are delicious. |
||
| − | |2 |
||
| + | | style="text-align:center;"|Get a car that's fast on icy straightaways. |
||
| − | |Icy Road |
||
| + | | style="text-align:center;"|[[File:Russia_Level_Star_-_GP_Story.png|100px]] |
||
| − | |3 |
||
| + | | style="text-align:center;"|360K |
||
| − | |Move to 3rd Workshop |
||
| + | | style="text-align:center;"|2 |
||
| − | | |
||
| + | | style="text-align:center;"|Icy Road |
||
| + | | style="text-align:center;"|3 |
||
| + | | style="text-align:center;"|Move to 3rd Workshop |
||
| + | | style="text-align:center;"|160 [[File:Research_Points-GrandPrixStory.png]] |
||
|- |
|- |
||
| + | | style="text-align:center;"|[[File:UK_GP_Circuit_-_GP_Story.png|100px]] |
||
| − | |UK |
||
| + | | style="text-align:center;"| |
||
| − | |380K |
||
| + | UK GP<br>(Instead of England GP) |
||
| − | |1 |
||
| + | | style="text-align:center;"|A gentleman's GP complete with tea and crumpets. |
||
| − | |On-Road |
||
| + | | style="text-align:center;"|Nail the last turn without decelerating! |
||
| − | |3 |
||
| + | | style="text-align:center;"|[[File:UK_Level_Star_-_GP_Story.png|100px]] |
||
| − | |Move to 3rd Workshop |
||
| + | | style="text-align:center;"|380K |
||
| − | | |
||
| + | | style="text-align:center;"|1 |
||
| + | | style="text-align:center;"|On-Road |
||
| + | | style="text-align:center;"|3 |
||
| + | | style="text-align:center;"|Win Germany GP |
||
| + | | style="text-align:center;"|180 [[File:Research_Points-GrandPrixStory.png]] |
||
|- |
|- |
||
| + | | style="text-align:center;"|[[File:USA_GP_Circuit_-_GP_Story.png|100px]] |
||
| − | |USA |
||
| + | | style="text-align:center;"|USA GP |
||
| − | |400K |
||
| + | | style="text-align:center;"|Origin of motorsports and the auto industry. |
||
| − | |2 |
||
| + | | style="text-align:center;"|Zip down those long straights at top speed! |
||
| − | |On-Road |
||
| + | | style="text-align:center;"|[[File:USA_Level_Star_-_GP_Story.png|100px]] |
||
| − | |3 |
||
| + | | style="text-align:center;"|400K |
||
| − | |Move to 3rd Workshop |
||
| + | | style="text-align:center;"|2 |
||
| − | | |
||
| + | | style="text-align:center;"|On-Road |
||
| + | | style="text-align:center;"|3 |
||
| + | | style="text-align:center;"|Win Russia GP |
||
| + | | style="text-align:center;"|200 [[File:Research_Points-GrandPrixStory.png]] |
||
|- |
|- |
||
| + | | style="text-align:center;"| |
||
| − | |Malaysia |
||
| + | | style="text-align:center;"|Malaysia GP |
||
| − | | |
||
| + | | style="text-align:center;"|Long straightaways, mild curves. Very hot! |
||
| − | |1 |
||
| + | | style="text-align:center;"|Mild course, requiring speed and accel. |
||
| − | |On-Road |
||
| + | | style="text-align:center;"|[[File:Formula_Asia_Star_Rating_-_Grand_Prix_Story.png|100px]] |
||
| − | |3 |
||
| + | | style="text-align:center;"|160K |
||
| − | |Formula Asia only |
||
| + | | style="text-align:center;"|1 |
||
| − | | |
||
| + | | style="text-align:center;"|On-Road |
||
| + | | style="text-align:center;"|<nowiki>-</nowiki> |
||
| + | | style="text-align:center;"|Formula Asia only |
||
| + | | style="text-align:center;"|N/A |
||
|- |
|- |
||
| + | | style="text-align:center;"| |
||
| − | |Turkey |
||
| + | | style="text-align:center;"|Turkey GP |
||
| − | | |
||
| + | | style="text-align:center;"|Runs counter-clockwise. Will test your endurance. |
||
| − | |1 |
||
| + | | style="text-align:center;"|Requires high stats in all areas. |
||
| − | |On-Road |
||
| + | | style="text-align:center;"|[[File:Formula_Asia_Star_Rating_-_Grand_Prix_Story.png|100px]] |
||
| − | |3 |
||
| + | | style="text-align:center;"|200K |
||
| − | |Formula Asia only |
||
| + | | style="text-align:center;"|1 |
||
| − | | |
||
| + | | style="text-align:center;"|On-Road |
||
| + | | style="text-align:center;"|<nowiki>-</nowiki> |
||
| + | | style="text-align:center;"|Formula Asia only |
||
| + | | style="text-align:center;"|N/A |
||
|- |
|- |
||
| + | | style="text-align:center;"| |
||
| − | |China |
||
| + | | style="text-align:center;"|China GP |
||
| − | | |
||
| + | | style="text-align:center;"|Boasts a distinctive layout. Very popular. |
||
| − | |1 |
||
| + | | style="text-align:center;"|Needs handling, and speed for the final straightaway. |
||
| − | |On-Road |
||
| + | | style="text-align:center;"|[[File:Formula_Asia_Star_Rating_-_Grand_Prix_Story.png|100px]] |
||
| − | |3 |
||
| + | | style="text-align:center;"|260K |
||
| − | |Formula Asia only |
||
| + | | style="text-align:center;"|1 |
||
| − | | |
||
| + | | style="text-align:center;"|On-Road |
||
| + | | style="text-align:center;"|<nowiki>-</nowiki> |
||
| + | | style="text-align:center;"|Formula Asia only |
||
| + | | style="text-align:center;"|N/A |
||
|- |
|- |
||
| + | | style="text-align:center;"|[[File:Australia_GP_Circuit_-_GP_Story.png|100px]] |
||
| − | |Australia |
||
| + | | style="text-align:center;"|Australia GP |
||
| − | | |
||
| + | | style="text-align:center;"|Mid/high-speed circuit. Watch out for koalas. |
||
| − | |1 |
||
| + | | style="text-align:center;"|Prioritize speed. |
||
| − | |On-Road |
||
| + | | style="text-align:center;"|[[File:Formula_No._One_Rating_Star_-_GP_Story.png|100px]] |
||
| − | |3 |
||
| + | | style="text-align:center;"|220K |
||
| − | |Formula No. One only |
||
| + | | style="text-align:center;"|1 |
||
| − | | |
||
| + | | style="text-align:center;"|On-Road |
||
| + | | style="text-align:center;"|<nowiki>-</nowiki> |
||
| + | | style="text-align:center;"|Formula No. One only |
||
| + | | style="text-align:center;"|N/A |
||
|- |
|- |
||
| + | | style="text-align:center;"|[[File:Italy_GP_Circuit_-_GP_Story.png|100px]] |
||
| − | |Italy |
||
| + | | style="text-align:center;"|Italy GP |
||
| − | | |
||
| + | | style="text-align:center;"|Home to a renowned team. Engine power! |
||
| − | |2 |
||
| + | | style="text-align:center;"|Long straightaways need speed and accel. |
||
| − | |On-Road |
||
| + | | style="text-align:center;"|[[File:Formula_No._One_Rating_Star_-_GP_Story.png|100px]] |
||
| − | |3 |
||
| + | | style="text-align:center;"|240K |
||
| − | |Formula No. One only |
||
| + | | style="text-align:center;"|2 |
||
| − | | |
||
| + | | style="text-align:center;"|On-Road |
||
| + | | style="text-align:center;"|<nowiki>-</nowiki> |
||
| + | | style="text-align:center;"|Formula No. One only |
||
| + | | style="text-align:center;"|N/A |
||
|- |
|- |
||
| + | | style="text-align:center;"|[[File:Mexico_GP_Circuit_-_GP_Story.png|100px]] |
||
| − | |Mexico |
||
| + | | style="text-align:center;"|Mexico GP |
||
| − | | |
||
| + | | style="text-align:center;"|High altitude and thin air will push your driver! |
||
| − | |1 |
||
| + | | style="text-align:center;"|A well-rounded, off-road vehicle is key. |
||
| − | |Off-Road |
||
| + | | style="text-align:center;"|[[File:Formula_No._One_Rating_Star_-_GP_Story.png|100px]] |
||
| − | |3 |
||
| + | | style="text-align:center;"|260K |
||
| − | |Formula No. One only |
||
| + | | style="text-align:center;"|1 |
||
| − | | |
||
| + | | style="text-align:center;"|Off-Road |
||
| + | | style="text-align:center;"|<nowiki>-</nowiki> |
||
| + | | style="text-align:center;"|Formula No. One only |
||
| + | | style="text-align:center;"|N/A |
||
|- |
|- |
||
| + | | style="text-align:center;"|[[File:Spain_GP_Circuit_-_GP_Story.png|100px]] |
||
| − | |Spain |
||
| + | | style="text-align:center;"|Spain GP |
||
| − | | |
||
| + | | style="text-align:center;"|Near a famous. This one's tough! |
||
| − | |1 |
||
| + | | style="text-align:center;"|Very tough turns, long straightaways. |
||
| − | |On-Road |
||
| + | | style="text-align:center;"|[[File:Formula_No._One_Rating_Star_-_GP_Story.png|100px]] |
||
| − | |3 |
||
| + | | style="text-align:center;"|280K |
||
| − | |Formula No. One only |
||
| + | | style="text-align:center;"|1 |
||
| − | | |
||
| + | | style="text-align:center;"|On-Road |
||
| + | | style="text-align:center;"|<nowiki>-</nowiki> |
||
| + | | style="text-align:center;"|Formula No. One only |
||
| + | | style="text-align:center;"|N/A |
||
|- |
|- |
||
| + | | style="text-align:center;"|[[File:Alaska_GP_Circuit_-_GP_Story.png|100px]] |
||
| − | |Norh Pole |
||
| + | | style="text-align:center;"|Alaska GP |
||
| − | | |
||
| + | | style="text-align:center;"|Entirely permafrost! Mammoth bones too! |
||
| − | |2 |
||
| + | | style="text-align:center;"|An icy circuit with tricky turns. |
||
| − | |Icy-Road |
||
| + | | style="text-align:center;"|[[File:Formula_No._One_Rating_Star_-_GP_Story.png|100px]] |
||
| − | |3 |
||
| + | | style="text-align:center;"|300K |
||
| − | |Formula No. One only |
||
| + | | style="text-align:center;"|2 |
||
| + | | style="text-align:center;"|Icy-Road |
||
| + | | style="text-align:center;"|<nowiki>-</nowiki> |
||
| + | | style="text-align:center;"|Formula No. One only |
||
| + | | style="text-align:center;"|N/A |
||
| + | |- |
||
| + | | style="text-align:center;"|[[File:Monaco_GP_Circuit_-_GP_Story.png|100px]] |
||
| + | | style="text-align:center;"|Monaco GP |
||
| + | | style="text-align:center;"|A narrow course, home to the world's elite. |
||
| + | | style="text-align:center;"|Many turns. You'll need both handling and luck. |
||
| + | | style="text-align:center;"|[[File:Formula_No._One_Rating_Star_-_GP_Story.png|100px]] |
||
| + | | style="text-align:center;"|320K |
||
| + | | style="text-align:center;"|2 |
||
| + | | style="text-align:center;"|On-Road |
||
| + | | style="text-align:center;"|<nowiki>-</nowiki> |
||
| + | | style="text-align:center;"|Formula No. One only |
||
| + | | style="text-align:center;"|N/A |
||
| + | |- |
||
| + | | style="text-align:center;"|[[File:Chimp_Island_GP_Circuit_-_GP_Story.png|100px]] |
||
| + | | style="text-align:center;"|Chimp Island GP |
||
| + | | style="text-align:center;"|A mysterious isle inhabited by chimps. |
||
| + | | style="text-align:center;"|Come with your best car and driver. |
||
| + | | style="text-align:center;"| |
||
| + | | style="text-align:center;"|2000K |
||
| + | | style="text-align:center;"|1 |
||
| + | | style="text-align:center;"|On-Road |
||
| + | | style="text-align:center;"|4 |
||
| |
| |
||
| + | <p style="text-align:center;">Appears the first time after clearing Formula No. One.</p> |
||
| + | <p style="text-align:center;">After completing the first time, appears again annually.</p> |
||
| + | | style="text-align:center;"|'''Banana Car''' plans<br />or<br />250 [[File:Research_Points-GrandPrixStory.png]]<sup>1</sup> |
||
|- |
|- |
||
| + | | style="text-align:center;"| |
||
| − | |Monaco |
||
| + | | style="text-align:center;"|Kairoland GP |
||
| + | | style="text-align:center;"| |
||
| + | | style="text-align:center;"| |
||
| + | | style="text-align:center;"| |
||
| + | | style="text-align:center;"|2000K |
||
| + | | style="text-align:center;"|1 |
||
| + | | style="text-align:center;"|On-Road |
||
| + | | style="text-align:center;"|4 |
||
| |
| |
||
| + | <p style="text-align:center;">Appears the first time after clearing Chimp Island.</p> |
||
| − | |2 |
||
| + | <p style="text-align:center;">After completing the first time, appears again annually.</p> |
||
| − | |On-Road |
||
| + | | style="text-align:center;"|'''Kairo Car''' plans<br />or<br />300 [[File:Research_Points-GrandPrixStory.png]]<sup>1</sup> |
||
| − | |3 |
||
| − | |Formula No. One only |
||
| − | | |
||
| − | |- |
||
| − | |Chimp Island |
||
| − | |2000K |
||
| − | |1 |
||
| − | |On-Rd |
||
| − | |4 |
||
| − | |Appears the first time after clearing Formula No. One. |
||
| − | After completing the first time, appears again annually. |
||
| − | |Banana Car plans |
||
| − | '''or''' |
||
| − | |||
| − | 250 Research Points<sup>1</sup> |
||
| − | |- |
||
| − | |Kairoland |
||
| − | |2000K |
||
| − | |1 |
||
| − | |On-Rd |
||
| − | |4 |
||
| − | |Appears the first time after clearing Chimp Island. |
||
| − | After completing the first time, appears again annually. |
||
| − | |Kairo Car plans |
||
|} |
|} |
||
| − | < |
+ | <small>1. Reward if original reward was brought over from a previous play through.</small> |
==Grand Prix Races== |
==Grand Prix Races== |
||
| + | The first Grand Prix is unlocked by winning the first five races. Winning a Grand Prix allows you to move up to the next Grand Prix, which comes with a free expansion of your garage.[[File:GP_Entries_Sticker_-_Grand_Prix_Story.png|thumb|150px]] You can enter a Grand Prix one year (to the week) after you started the previous Grand Prix. |
||
| − | If you have the requirement to apply for a Grand Prix, the most advanced Grand Prix you can apply for will start accepting entries every year on the beginning of month 9 {{Confirm}}. Other than the first Grand Prix which you unlock by winning each race once, you unlock the subsequent Grand Prix tournaments by beating the one before it. Unlike normal races, Grand Prix races have 10 drivers. |
||
| − | The amounts awarded for each individual race is the same as above. |
+ | Unlike normal races, Grand Prix races have 8 drivers apart from your own. The amounts awarded for each individual race is the same as above.[[File:Current_GP_Points_-_Grand_Prix_Story.png|thumb|150px]] |
| − | Points are also calculated each race, with the final tally determining the winner. If you are racing 2 cars, |
+ | Points are also calculated each race, with the final tally determining the winner. If you are racing 2 cars, you receive the higher amount of points, and the lower amount is not awarded to any team. Points are distributed as follows: |
{| class="centertext" |
{| class="centertext" |
||
| Line 231: | Line 384: | ||
!8th |
!8th |
||
!9th |
!9th |
||
| + | !10th |
||
|- |
|- |
||
|13 |
|13 |
||
| + | |10 |
||
|8 |
|8 |
||
|6 |
|6 |
||
| Line 249: | Line 404: | ||
!Weeks Between Races |
!Weeks Between Races |
||
|- |
|- |
||
| − | |Formula Smile |
+ | | style="text-align:center;"|Formula Smile |
| + | | style="text-align:center;"|$500K |
||
| − | |$500K |
||
| + | | style="text-align:center;"|5 |
||
| − | |5 |
||
| + | | style="text-align:center;"|4 |
||
| − | |4 |
||
|- |
|- |
||
| − | |Formula Asia |
+ | | style="text-align:center;"|Formula Asia |
| + | | style="text-align:center;"|$1000K |
||
| − | |$1000K |
||
| + | | style="text-align:center;"|6 |
||
| − | |6 |
||
| + | | style="text-align:center;"|4 |
||
| − | |4 |
||
|- |
|- |
||
| − | |Formula No. One |
+ | | style="text-align:center;"|Formula No. One |
| + | | style="text-align:center;"|$2000K |
||
| − | |$2000K |
||
| + | | style="text-align:center;"|6 |
||
| − | |6 |
||
| + | | style="text-align:center;"|4 |
||
| − | |4 |
||
|} |
|} |
||
| + | |||
| + | ==Team Rank== |
||
| + | When viewing the team rank, you may see the info of:[[File:Viewing_Team_Rank_-_Grand_Prix_Story.png|thumb|150px]] |
||
| + | *Formula Category |
||
| + | *Team Name |
||
| + | *Current Points |
||
| + | *Next Race |
||
| + | |||
| + | ==GP Schedule== |
||
| + | ===Formula Smile=== |
||
| + | <span style="font-weight:normal;">Level:[[File:Formula_Smile_Star_Rating_-_GP_Story.png|100px]]</span> |
||
| + | {| border="1" cellpadding="1" cellspacing="1" class="article-table" |
||
| + | |- |
||
| + | ! scope="row" style="text-align:center;"|Round |
||
| + | ! scope="col" style="text-align:center;"|Icon |
||
| + | ! scope="col" style="text-align:center;"|Name |
||
| + | ! scope="col" style="text-align:center;"|Road Condition |
||
| + | ! scope="col" style="text-align:center;"|Teams |
||
| + | ! scope="col" style="text-align:center;"|1st Prize ($) |
||
| + | |- |
||
| + | ! scope="row" style="text-align:center;"|1 |
||
| + | | style="text-align:center;"| |
||
| + | | style="text-align:center;"|Bloomtown |
||
| + | | style="text-align:center;"|On-Rd |
||
| + | | style="text-align:center;"|6 |
||
| + | | style="text-align:center;"|500.0K |
||
| + | |- |
||
| + | ! scope="row" style="text-align:center;"|2 |
||
| + | | style="text-align:center;"| |
||
| + | | style="text-align:center;"|Sand Beach |
||
| + | | style="text-align:center;"|On-Rd |
||
| + | | style="text-align:center;"|6 |
||
| + | | style="text-align:center;"|500.0K |
||
| + | |- |
||
| + | ! scope="row" style="text-align:center;"|3 |
||
| + | | style="text-align:center;"| |
||
| + | | style="text-align:center;"|Dusty Plains |
||
| + | | style="text-align:center;"|On-Rd |
||
| + | | style="text-align:center;"|6 |
||
| + | | style="text-align:center;"|500.0K |
||
| + | |- |
||
| + | ! scope="row" style="text-align:center;"|4 |
||
| + | | style="text-align:center;"| |
||
| + | | style="text-align:center;"|Snowville |
||
| + | | style="text-align:center;"|On-Rd |
||
| + | | style="text-align:center;"|6 |
||
| + | | style="text-align:center;"|500.0K |
||
| + | |- |
||
| + | ! scope="row" style="text-align:center;"|5 |
||
| + | | style="text-align:center;"| |
||
| + | | style="text-align:center;"|Zen Garden |
||
| + | | style="text-align:center;"|On-Rd |
||
| + | | style="text-align:center;"|6 |
||
| + | | style="text-align:center;"|500.0K |
||
| + | |} |
||
| + | |||
| + | ===Formula Asia=== |
||
| + | Level:[[File:Formula_Asia_Star_Rating_-_Grand_Prix_Story.png|100px]] |
||
| + | {| border="1" cellpadding="1" cellspacing="1" class="article-table" |
||
| + | |- |
||
| + | ! scope="row" style="text-align:center;"|Round |
||
| + | ! scope="col" style="text-align:center;"|Icon |
||
| + | ! scope="col" style="text-align:center;"|Name |
||
| + | ! scope="col" style="text-align:center;"|Road Condition |
||
| + | ! scope="col" style="text-align:center;"|Teams |
||
| + | ! scope="col" style="text-align:center;"|1st Prize ($) |
||
| + | |- |
||
| + | ! scope="row" style="text-align:center;"|1 |
||
| + | | style="text-align:center;"|[[File:Malaysia_GP_Flag_-_Grand_Prix_Story.png|30px]] |
||
| + | | style="text-align:center;"|Malaysia GP |
||
| + | | style="text-align:center;"|On-Rd |
||
| + | | style="text-align:center;"|7 |
||
| + | | style="text-align:center;"|1,000.0K |
||
| + | |- |
||
| + | ! scope="row" style="text-align:center;"|2 |
||
| + | | style="text-align:center;"|[[File:Japan_GP_Flag_-_Grand_Prix_Story.png|30px]] |
||
| + | | style="text-align:center;"|Japan GP |
||
| + | | style="text-align:center;"|On-Rd |
||
| + | | style="text-align:center;"|7 |
||
| + | | style="text-align:center;"|1,000.0K |
||
| + | |- |
||
| + | ! scope="row" style="text-align:center;"|3 |
||
| + | | style="text-align:center;"|[[File:Turkey_GP_Flag_-_Grand_Prix_Story.png|30px]] |
||
| + | | style="text-align:center;"|Turkey GP |
||
| + | | style="text-align:center;"|On-Rd |
||
| + | | style="text-align:center;"|7 |
||
| + | | style="text-align:center;"|1,000.0K |
||
| + | |- |
||
| + | ! scope="row" style="text-align:center;"|4 |
||
| + | | style="text-align:center;"|[[File:Egypt_GP_Flag_-_Grand_Prix_Story.png|30px]] |
||
| + | | style="text-align:center;"|Egypt GP |
||
| + | | style="text-align:center;"|Off-Rd |
||
| + | | style="text-align:center;"|7 |
||
| + | | style="text-align:center;"|1,000.0K |
||
| + | |- |
||
| + | ! scope="row" style="text-align:center;"|5 |
||
| + | | style="text-align:center;"|[[File:Hungary_GP_Flag_-_Grand_Prix_Story.png|30px]] |
||
| + | | style="text-align:center;"|Hungary GP |
||
| + | | style="text-align:center;"|On-Rd |
||
| + | | style="text-align:center;"|7 |
||
| + | | style="text-align:center;"|1,000.0K |
||
| + | |- |
||
| + | ! scope="row" style="text-align:center;"|6 |
||
| + | | style="text-align:center;"|[[File:China_GP_Flag_-_Grand_Prix_Story.png|30px]] |
||
| + | | style="text-align:center;"|China GP |
||
| + | | style="text-align:center;"|On-Rd |
||
| + | | style="text-align:center;"|7 |
||
| + | | style="text-align:center;"|1,000.0K |
||
| + | |} |
||
| + | |||
| + | ===Formula No. One=== |
||
| + | |||
| + | <span style="font-weight:normal;">Level: [[File:Formula_No._One_Rating_Star_-_GP_Story.png|100px]]</span> |
||
| + | {| border="1" cellpadding="1" cellspacing="1" class="article-table" |
||
| + | |- |
||
| + | ! scope="row" style="text-align:center;"|Round |
||
| + | ! scope="col" style="text-align:center;"|Icon |
||
| + | ! scope="col" style="text-align:center;"|Name |
||
| + | ! scope="col" style="text-align:center;"|Road Condition |
||
| + | ! scope="col" style="text-align:center;"|Teams |
||
| + | ! scope="col" style="text-align:center;"|1st Prize ($) |
||
| + | |- |
||
| + | ! scope="row" style="text-align:center;"|1 |
||
| + | | style="text-align:center;"| |
||
| + | | style="text-align:center;"|Australia GP |
||
| + | | style="text-align:center;"|On-Rd |
||
| + | | style="text-align:center;"|8 |
||
| + | | style="text-align:center;"|2,000.0K |
||
| + | |- |
||
| + | ! scope="row" style="text-align:center;"|2 |
||
| + | | style="text-align:center;"| |
||
| + | | style="text-align:center;"|Italy GP |
||
| + | | style="text-align:center;"|On-Rd |
||
| + | | style="text-align:center;"|8 |
||
| + | | style="text-align:center;"|2,000.0K |
||
| + | |- |
||
| + | ! scope="row" style="text-align:center;"|3 |
||
| + | | style="text-align:center;"| |
||
| + | | style="text-align:center;"|Mexico GP |
||
| + | | style="text-align:center;"|Off-Rd |
||
| + | | style="text-align:center;"|8 |
||
| + | | style="text-align:center;"|2,000.0K |
||
| + | |- |
||
| + | ! scope="row" style="text-align:center;"|4 |
||
| + | | style="text-align:center;"| |
||
| + | | style="text-align:center;"|Spain GP |
||
| + | | style="text-align:center;"|On-Rd |
||
| + | | style="text-align:center;"|8 |
||
| + | | style="text-align:center;"|2,000.0K |
||
| + | |- |
||
| + | ! scope="row" style="text-align:center;"|5 |
||
| + | | style="text-align:center;"| |
||
| + | | style="text-align:center;"|Alaska GP |
||
| + | | style="text-align:center;"|Icy-Rd |
||
| + | | style="text-align:center;"|8 |
||
| + | | style="text-align:center;"|2,000.0K |
||
| + | |- |
||
| + | ! scope="row" style="text-align:center;"|6 |
||
| + | | style="text-align:center;"| |
||
| + | | style="text-align:center;"|Monaco GP |
||
| + | | style="text-align:center;"|On-Rd |
||
| + | | style="text-align:center;"|8 |
||
| + | | style="text-align:center;"|2,000.0K |
||
| + | |} |
||
| + | |||
| + | ==Team List== |
||
| + | / - Participating |
||
| + | |||
| + | *The player's team name is not included. |
||
| + | {| border="1" cellpadding="1" cellspacing="1" class="article-table article-table-selected" |
||
| + | |- |
||
| + | ! scope="col" style="text-align:center;"|Name |
||
| + | ! scope="col" style="text-align:center;"|Formula Smile |
||
| + | ! scope="col" style="text-align:center;"|Formula Asia |
||
| + | ! scope="col" style="text-align:center;"|Formula No. One |
||
| + | |- |
||
| + | | style="text-align:center;"|South Suns |
||
| + | | style="text-align:center;"|/ |
||
| + | | style="text-align:center;"| |
||
| + | | style="text-align:center;"| |
||
| + | |- |
||
| + | | style="text-align:center;"|Sunday Seals |
||
| + | | style="text-align:center;"|/ |
||
| + | | style="text-align:center;"| |
||
| + | | style="text-align:center;"| |
||
| + | |- |
||
| + | | style="text-align:center;"|Nice Guys |
||
| + | | style="text-align:center;"|/ |
||
| + | | style="text-align:center;"| |
||
| + | | style="text-align:center;"| |
||
| + | |- |
||
| + | | style="text-align:center;"|Formula None |
||
| + | | style="text-align:center;"|/ |
||
| + | | style="text-align:center;"| |
||
| + | | style="text-align:center;"| |
||
| + | |- |
||
| + | | style="text-align:center;"|Race Radishes |
||
| + | | style="text-align:center;"|/ |
||
| + | | style="text-align:center;"| |
||
| + | | style="text-align:center;"| |
||
| + | |- |
||
| + | | style="text-align:center;"|Blues Skies |
||
| + | | style="text-align:center;"|/ |
||
| + | | style="text-align:center;"| |
||
| + | | style="text-align:center;"| |
||
| + | |- |
||
| + | | style="text-align:center;"|Roadtrotters |
||
| + | | style="text-align:center;"| |
||
| + | | style="text-align:center;"|/ |
||
| + | | style="text-align:center;"| |
||
| + | |- |
||
| + | | style="text-align:center;"|Asphalt Angels |
||
| + | | style="text-align:center;"| |
||
| + | | style="text-align:center;"|/ |
||
| + | | style="text-align:center;"| |
||
| + | |- |
||
| + | | style="text-align:center;"|Super Novas |
||
| + | | style="text-align:center;"| |
||
| + | | style="text-align:center;"|/ |
||
| + | | style="text-align:center;"| |
||
| + | |- |
||
| + | | style="text-align:center;"|Black Holes |
||
| + | | style="text-align:center;"| |
||
| + | | style="text-align:center;"|/ |
||
| + | | style="text-align:center;"| |
||
| + | |- |
||
| + | | style="text-align:center;"|Liquid Fire |
||
| + | | style="text-align:center;"| |
||
| + | | style="text-align:center;"|/ |
||
| + | | style="text-align:center;"| |
||
| + | |- |
||
| + | | style="text-align:center;"|Billy Goats |
||
| + | | style="text-align:center;"| |
||
| + | | style="text-align:center;"|/ |
||
| + | | style="text-align:center;"| |
||
| + | |- |
||
| + | | style="text-align:center;"|Eat Our Dust |
||
| + | | style="text-align:center;"| |
||
| + | | style="text-align:center;"|/ |
||
| + | | style="text-align:center;"| |
||
| + | |- |
||
| + | | style="text-align:center;"|Sonic Terror |
||
| + | | style="text-align:center;"| |
||
| + | | style="text-align:center;"| |
||
| + | | style="text-align:center;"|/ |
||
| + | |- |
||
| + | | style="text-align:center;"|Zoom Zooms |
||
| + | | style="text-align:center;"| |
||
| + | | style="text-align:center;"| |
||
| + | | style="text-align:center;"|/ |
||
| + | |- |
||
| + | | style="text-align:center;"|Canton Cows |
||
| + | | style="text-align:center;"| |
||
| + | | style="text-align:center;"| |
||
| + | | style="text-align:center;"|/ |
||
| + | |- |
||
| + | | style="text-align:center;"|Horde Motors |
||
| + | | style="text-align:center;"| |
||
| + | | style="text-align:center;"| |
||
| + | | style="text-align:center;"|/ |
||
| + | |- |
||
| + | | style="text-align:center;"|Greased Light |
||
| + | | style="text-align:center;"| |
||
| + | | style="text-align:center;"| |
||
| + | | style="text-align:center;"|/ |
||
| + | |- |
||
| + | | style="text-align:center;"|BMUU Motors |
||
| + | | style="text-align:center;"| |
||
| + | | style="text-align:center;"| |
||
| + | | style="text-align:center;"|/ |
||
| + | |- |
||
| + | | style="text-align:center;"|Fight Farm 5 |
||
| + | | style="text-align:center;"| |
||
| + | | style="text-align:center;"| |
||
| + | | style="text-align:center;"|/ |
||
| + | |- |
||
| + | | style="text-align:center;"|Fasternyu |
||
| + | | style="text-align:center;"| |
||
| + | | style="text-align:center;"| |
||
| + | | style="text-align:center;"|/ |
||
| + | |} |
||
| + | |||
| + | ==Gallery== |
||
| + | <gallery widths="100"> |
||
| + | Bloomtown Map - Grand Prix Story.png|Bloomtown Map |
||
| + | Zen Garden Map - Grand Prix Story.png|Zen Garden Map |
||
| + | Dusty Plains Map - Grand Prix Story.png|Dusty Plains Map |
||
| + | Sand Beach Map - Grand Prix Story.png|Sand Beach Map |
||
| + | Workshop No Driver No Mechanic - Grand Prix Story.png|Workshop with no team of both driver and mechanic |
||
| + | Group With Empty 5 Chairs (Grand Prix Story).png|Viewing Group Info |
||
| + | Formula No. One with 1st Trophy - GP Story.png|1st Place Trophy of Formula No. One |
||
| + | </gallery> |
||
Latest revision as of 12:47, 23 January 2024
| |
|---|
|
|
There are many different races you can compete in, with various degrees of difficulty. Once you have a winning a GP in normal race, you will not receive the Winning Message during Grand Prix.
Special Message
| Condition | Message |
|---|---|
| Full Driver's Energy | I slept like a baby last night, so I think I'll do well today. |
| Pre-GP Race | The Grand Prix is about to begin. I'll try to start out with a bang! |
| Last GP Race with Bad Performance | This is the last race, but I won't give up. We might pull off an upset victory |
| GP Podium Winning Streak | I think we're in good shape, but I won't let my guard down. |
| Road Condition Compatible | The road conditions are perfect! I should be able to go even faster than usual! |
Team Info
When viewing the team info, you may see the info of:

- Your Team Name
- Formula Category
- No. Members
- Total Salary
- Total Prize
- Record Win/Played Race
- No. Researched Vehicle
- No. Researched Part
- Image of Researched Vehicle
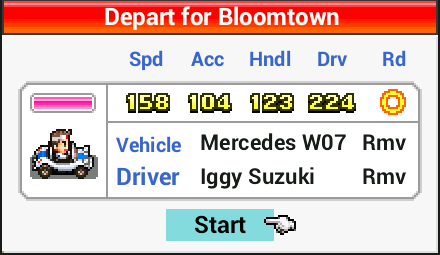
Departing a Race
When viewing the depart for race, you may see the info of:
- Vehicle Durability Bar
- Aura
- Driver
- Vehicle Type
- Speed
- Acceleration
- Handling
- Driving
- Road Condition
Pre-Race
You may perform a preliminary time trial that determines your starting order in the race.
Normal Races
The prize listed is given to the driver in 1st place. 2nd place gets 50%, 3rd gets 30%, 4th gets 20%, 5th gets 15%, 6th gets 13.6%, 7th gets 12.7%, 8th gets 11.8%, 9th gets 10.9%, and 10th gets 10%.
The image is 100 px - For Reference to Image Placeholder
![]() denotes amount in Research Point rewards.
denotes amount in Research Point rewards.
| Image | Race | Description | Hint | Level | Prize ($) | Laps | Road Type | Weeks | Unlock | Reward For First Win |
|---|---|---|---|---|---|---|---|---|---|---|

|
Bloomtown | Simple but deep layout. | Requires balanced stats. | 80K | 1 | On-Road | 1 | First race | Bridgerock sponsorship | |

|
Zen Garden | An oval, high-speed urban circuit. | Mild turns. Focus on speed and accel. | 120K | 1 | On-Road | 2 | Win Bloomtown | 50 | |

|
Dusty Plains | Starts off with many turns. Brace yourself! | Speed and accel. are key here. | 140K | 1 | On-Road | 2 | Win Bloomtown | Mocha Cola sponsorship | |

|
Snowville | Turns abound. Snow too. | Handling and accel. needed for turns. | 180K | 1 | On-Road | 2 | Win Dusty Plains | Dragster plans or 70 | |

|
Sand Beach | Yow, hot! Sharp turns after the straights! | Focus on both speed and handling! | 200K | 1 | On-Road | 2 |
Win Snowville |
70 | |

|
Japan GP | New circuit built near the sea. Short, with many turns. | Many tight curves. Needs handling. | 240K | 1 | On-Road | 3 | Move to 2nd Workshop | Wing Car plans | |

|
Hungary GP | Mid-length, low-speed. Gears.tires are crucial! | Needs speed and accel. | 280K | 1 | On-Road | 3 | Move to 2nd Workshop | 80 | |

|
Egypt GP | Shaped like a pharaoh's seal. | Use an off-roader with speed and accel. | 260K | 1 | Off-Road | 3 | Move to 2nd Workshop | Stdlss Tires part plans or 90 | |

|
Brazil GP | Runs counter-clockwise. Tests any team's mettle! | Accel. and handling for many twists and turns. | 300K | 2 | On-Road | 3 | Move to 2nd Workshop | 90 | |

|
Germany GP | A circuit of legend. Try the sausage too! | Gentle turns needing speed and accel. | 340K | 1 | On-Road | 3 | Move to 3rd Workshop | 140 | |

|
Russia GP | Outside Moscow. The piroshki are delicious. | Get a car that's fast on icy straightaways. | 360K | 2 | Icy Road | 3 | Move to 3rd Workshop | 160 | |

|
UK GP |
A gentleman's GP complete with tea and crumpets. | Nail the last turn without decelerating! | 380K | 1 | On-Road | 3 | Win Germany GP | 180 | |

|
USA GP | Origin of motorsports and the auto industry. | Zip down those long straights at top speed! | 400K | 2 | On-Road | 3 | Win Russia GP | 200 | |
| Malaysia GP | Long straightaways, mild curves. Very hot! | Mild course, requiring speed and accel. | 160K | 1 | On-Road | - | Formula Asia only | N/A | ||
| Turkey GP | Runs counter-clockwise. Will test your endurance. | Requires high stats in all areas. | 200K | 1 | On-Road | - | Formula Asia only | N/A | ||
| China GP | Boasts a distinctive layout. Very popular. | Needs handling, and speed for the final straightaway. | 260K | 1 | On-Road | - | Formula Asia only | N/A | ||

|
Australia GP | Mid/high-speed circuit. Watch out for koalas. | Prioritize speed. | 220K | 1 | On-Road | - | Formula No. One only | N/A | |

|
Italy GP | Home to a renowned team. Engine power! | Long straightaways need speed and accel. | 240K | 2 | On-Road | - | Formula No. One only | N/A | |

|
Mexico GP | High altitude and thin air will push your driver! | A well-rounded, off-road vehicle is key. | 260K | 1 | Off-Road | - | Formula No. One only | N/A | |

|
Spain GP | Near a famous. This one's tough! | Very tough turns, long straightaways. | 280K | 1 | On-Road | - | Formula No. One only | N/A | |

|
Alaska GP | Entirely permafrost! Mammoth bones too! | An icy circuit with tricky turns. | 300K | 2 | Icy-Road | - | Formula No. One only | N/A | |

|
Monaco GP | A narrow course, home to the world's elite. | Many turns. You'll need both handling and luck. | 320K | 2 | On-Road | - | Formula No. One only | N/A | |

|
Chimp Island GP | A mysterious isle inhabited by chimps. | Come with your best car and driver. | 2000K | 1 | On-Road | 4 |
Appears the first time after clearing Formula No. One. After completing the first time, appears again annually. |
Banana Car plans or 250 | |
| Kairoland GP | 2000K | 1 | On-Road | 4 |
Appears the first time after clearing Chimp Island. After completing the first time, appears again annually. |
Kairo Car plans or 300 |
1. Reward if original reward was brought over from a previous play through.
Grand Prix Races
The first Grand Prix is unlocked by winning the first five races. Winning a Grand Prix allows you to move up to the next Grand Prix, which comes with a free expansion of your garage.


You can enter a Grand Prix one year (to the week) after you started the previous Grand Prix. Unlike normal races, Grand Prix races have 8 drivers apart from your own. The amounts awarded for each individual race is the same as above.


Points are also calculated each race, with the final tally determining the winner. If you are racing 2 cars, you receive the higher amount of points, and the lower amount is not awarded to any team. Points are distributed as follows:
| 1st | 2nd | 3rd | 4th | 5th | 6th | 7th | 8th | 9th | 10th |
|---|---|---|---|---|---|---|---|---|---|
| 13 | 10 | 8 | 6 | 5 | 4 | 3 | 2 | 1 | 0 |
| Name | Prize | Tracks | Weeks Between Races |
|---|---|---|---|
| Formula Smile | $500K | 5 | 4 |
| Formula Asia | $1000K | 6 | 4 |
| Formula No. One | $2000K | 6 | 4 |
Team Rank
When viewing the team rank, you may see the info of:
- Formula Category
- Team Name
- Current Points
- Next Race
GP Schedule
Formula Smile
Level:![]()
| Round | Icon | Name | Road Condition | Teams | 1st Prize ($) |
|---|---|---|---|---|---|
| 1 | Bloomtown | On-Rd | 6 | 500.0K | |
| 2 | Sand Beach | On-Rd | 6 | 500.0K | |
| 3 | Dusty Plains | On-Rd | 6 | 500.0K | |
| 4 | Snowville | On-Rd | 6 | 500.0K | |
| 5 | Zen Garden | On-Rd | 6 | 500.0K |
Formula Asia
Level:![]()
| Round | Icon | Name | Road Condition | Teams | 1st Prize ($) |
|---|---|---|---|---|---|
| 1 | Malaysia GP | On-Rd | 7 | 1,000.0K | |
| 2 | Japan GP | On-Rd | 7 | 1,000.0K | |
| 3 | Turkey GP | On-Rd | 7 | 1,000.0K | |
| 4 | Egypt GP | Off-Rd | 7 | 1,000.0K | |
| 5 | Hungary GP | On-Rd | 7 | 1,000.0K | |
| 6 | China GP | On-Rd | 7 | 1,000.0K |
Formula No. One
Level: ![]()
| Round | Icon | Name | Road Condition | Teams | 1st Prize ($) |
|---|---|---|---|---|---|
| 1 | Australia GP | On-Rd | 8 | 2,000.0K | |
| 2 | Italy GP | On-Rd | 8 | 2,000.0K | |
| 3 | Mexico GP | Off-Rd | 8 | 2,000.0K | |
| 4 | Spain GP | On-Rd | 8 | 2,000.0K | |
| 5 | Alaska GP | Icy-Rd | 8 | 2,000.0K | |
| 6 | Monaco GP | On-Rd | 8 | 2,000.0K |
Team List
/ - Participating
- The player's team name is not included.
| Name | Formula Smile | Formula Asia | Formula No. One |
|---|---|---|---|
| South Suns | / | ||
| Sunday Seals | / | ||
| Nice Guys | / | ||
| Formula None | / | ||
| Race Radishes | / | ||
| Blues Skies | / | ||
| Roadtrotters | / | ||
| Asphalt Angels | / | ||
| Super Novas | / | ||
| Black Holes | / | ||
| Liquid Fire | / | ||
| Billy Goats | / | ||
| Eat Our Dust | / | ||
| Sonic Terror | / | ||
| Zoom Zooms | / | ||
| Canton Cows | / | ||
| Horde Motors | / | ||
| Greased Light | / | ||
| BMUU Motors | / | ||
| Fight Farm 5 | / | ||
| Fasternyu | / |
Gallery
")
")
")
")
")
.png "Group With Empty 5 Chairs (Grand Prix Story).png (11 KB)")