| |
|---|
|
|

[Dream Town Story] Tips thread[]
An easy way to earn Tours Vouchers:[]
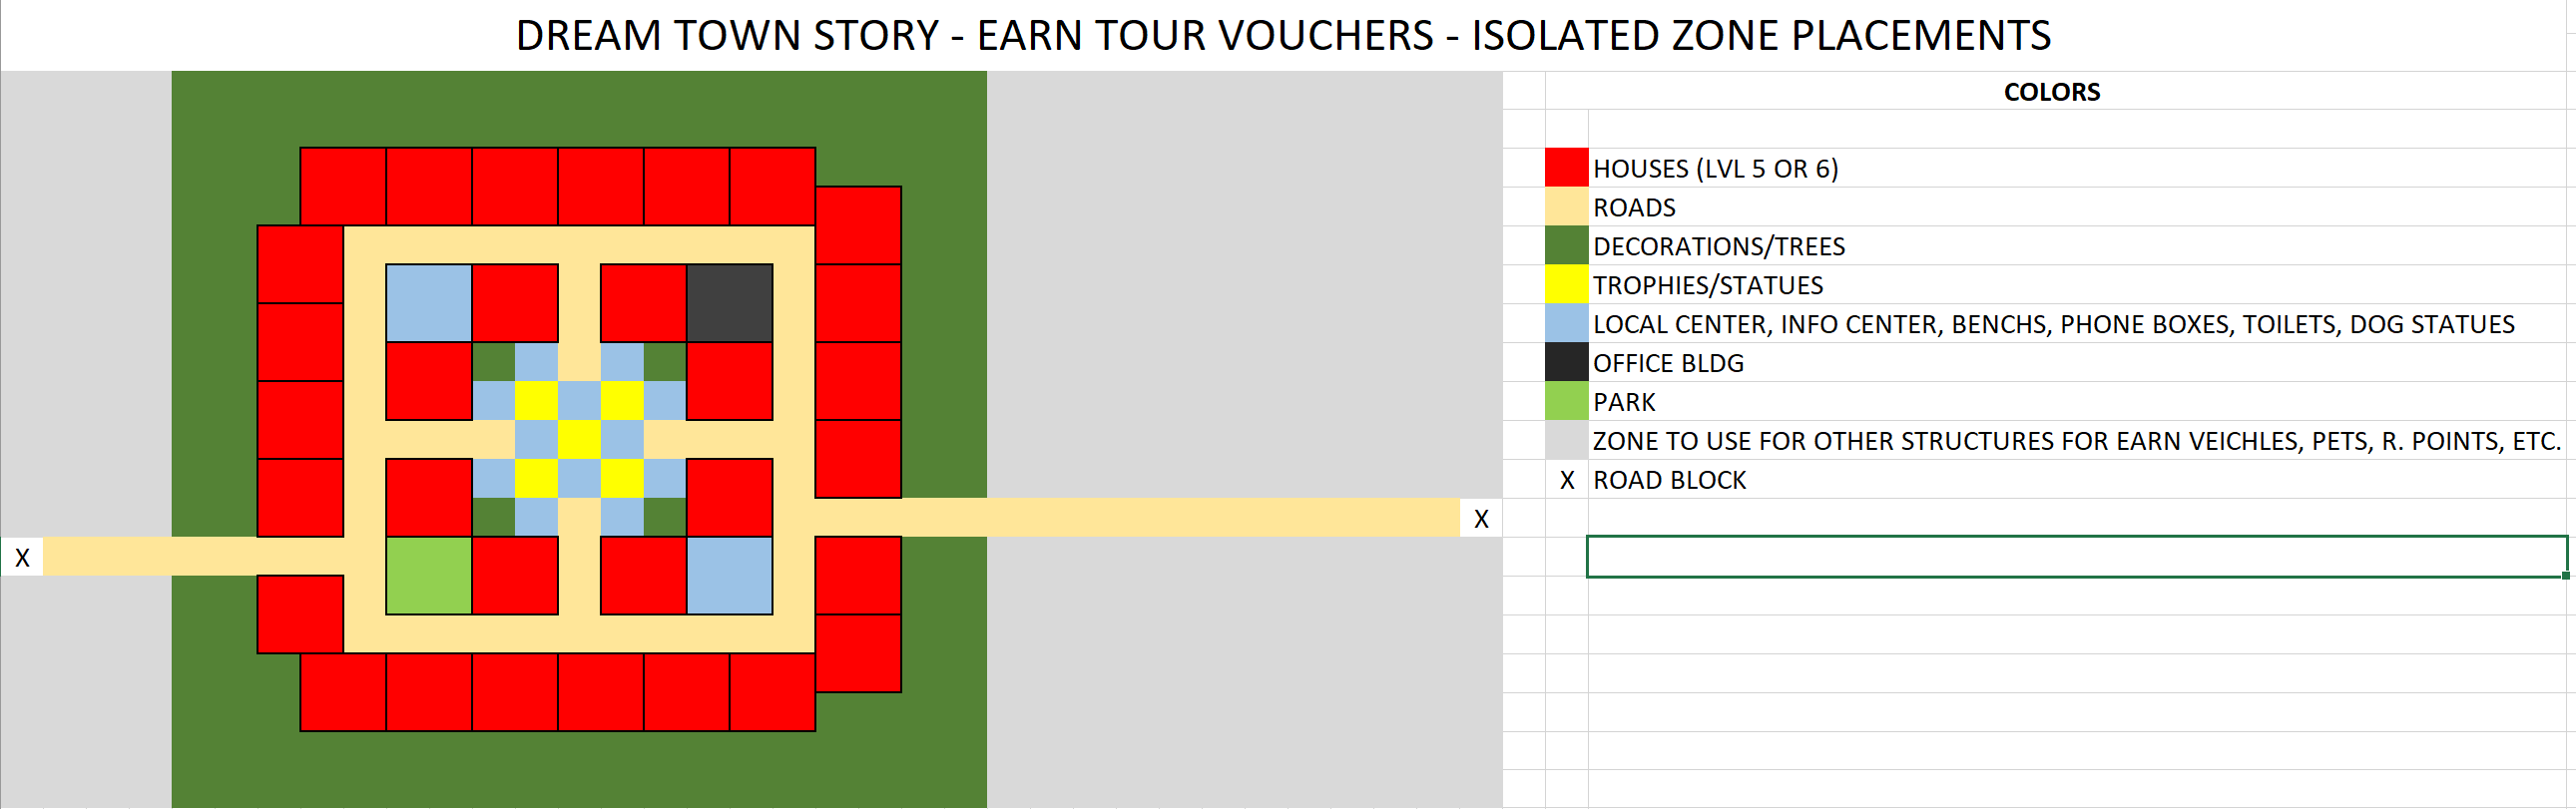
After a certain rank (60), you can concentrate on earning Tour Vouchers for the Next Town Map event.
The best strategy to earn TV fast is to isolate a part of the best housing (at least 10) and put some support buildings like a park, an office and at least 5-6 buildings that make Vouchers, like Bench, Toilet, Doggie Statue, Phone Box, Local Center and Info Center.
One of my experiments with 30 houses (LVL 5 and 6) for 2 people and 10 support buildings makes me earn 100 Tour Voucher in 3 minutes with Fast Mode active.
To isolate the buildings simple cut the Roads around the zone to isolate and remove any vehicle that fly from residents for best effect.
You can use the trick to earn: vehicles, pets, Research points, trophies, and stats placing in isolated zone specific structures that residents need.
Resident Contests (IQ, SKL, WRK, APL)[]
Generally, it's advisable that the resident you have selected to compete in the contest has at least 50 times the contest level (example: to win IQ Contest 3, the resident should have a minimum of 50 X 3 = 150 IQ). It's very well possible to get by with less, however, the chance of winning the contest may be lower.
When competing in the (Stat) Contest: Worldwide for the first time, your resident must have a minimum of Rank 6 (this means you must purchase a Medal from the Shop with some Kairo Pts, as the default maximum resident rank is capped at 5), and the required stat must be at least 500. Otherwise, you will not win. After winning this contest, it may be re-entered repeatedly in future game years by any resident with sufficient values in said stat. Also, the RNG will come into play at this point - in some attempts you can win with as few as 250 (stat), while in other attempts anything less than 1000 (stat) is a loss.
Very important note - the Comic Fair event does not and will not help you win these contests. Only the base stat, plus bonuses from the resident's job and pet, are considered.
When the Secretary says... (remember, because of the RNG, you may win/lose even when the odds are stacked in your favor or against you)
"We have decent chances of winning. Let's do this!" = you may win most of the time, with your points being greater than the other two rivals combined
"This is going to be a challenge but we have what it takes to win!" = you are favored to win, but there is a small chance of losing as well
"You are quite well-matched. This will be a good battle!" = you have roughly equal odds of winning and losing, with the point differences between the winner and the runner-up as low as 2 points apart
"Oh, this may be pretty hard... good luck!" = you are most likely going to lose
Winning level 8 contests gives you a Bronze Trophy, level 9 a Silver Trophy, and Worldwide a Gold Trophy. These trophies are often used for rare and special facility combos - Observation Tower alone has 6 different Special combos all utilizing a Bronze Trophy.
Area Challenges[]
Although it's tempting to place in the area all the facilities you need to finish the challenge, it's easier to just have them at the area's border/edge and connect them to the rest of your town. It's advisable to run Bonsai Festival (increases Research Point generation), or UFO Symposium (increases facility usage) and Book Festival (increases facility product prices), depending on the nature of the goal.
If the goal requires X amount of in-game G(Gold) e.g. 20,000G, it's all a matter of placing facilities in the area. At higher levels, you'll need facility combos and/or to equip the facilities with Pricing Tips/Manuals/Compendiums to finish within the required time. Speaking of which, do take note that your residents may visit only 1-3 facilities out of however many you have placed in the area.
For areas whose requirement is some amount of Research Points, use the list of 1x1 facilities below:
- Food Points = Vending Machines
- Service Points (bags) = Info Center
- Amusement Points (musical notes) = Phone Box, Lotto Ticket Shop
- Culture Points (books) = Trash Cans, Bench, Doggie Statue, Public Restrooms
If the goal requires some amount of Tour Vouchers, you're looking at a set of 6 1x1 facilities: Public Restrooms, Bench, Doggie Statue, Trash Cans, Phone Box, and Info Center. Equip these facilities with as many HP Tips as you have unlocked accessory slots for, to increase their effectiveness. A Local Center (2x2) also works. No other facilities are needed.
Global Challenges[]
1. the game picks 5 facilities in your town with the highest Land Price as the team in these challenges
2. Land Price = Hit Points; Profit = Attack Strength. You want these two stats to be highest for the best chances of winning these challenges
3. pay attention to the Victory Bonus multiplier in the Global Battle window. Any opponent whose multiplier is greater than "x1.0" is a very difficult opponent and will most likely result in a loss for you.
4. IIRC, by leveling up your Battle Stages, you can earn some Diggers (required to raise your town rank above Rank 30, each Digger increases the rank cap by 10) and at least one facility (notably the Golf Training Center, whose facility bonus is the Black Convertible - the best Expressway-only vehicle in the game at +13 Range)
5. At higher levels, all players inevitably utilize and bolster Airports. It's a special 8x10 Ind. B facility that is both a portal for quarterly guest tours and as an actual facility that your residents can visit. It's exempt from requiring same facility discoveries in loot boxes (secret box in Zing Set, 420 Diamonds) to unlock higher facility levels. Its facility bonus is the Jet ride, the best vehicle (and it flies!) in the game at +16 Range. Its large size makes it ideal for boosting it with lots of facility combos. For these reasons, it's highly recommended that you level up the Airport as quickly as possible, using the Level Up Facility items from the SHOP (126 Diamonds for 3 items).
buildings[]
Hi guys, do you surround your buildings with houses? or you put them by the road?